microCMS の設定が完了したので、次は microCMS からデータを取得するように Gatsby.js の方に手を入れます。また、 microCMS と Vercel に設定を加えて連携させ、 Gatsby.js + Vercel + microCMS の JAMStack 環境を構築します。
改修
今回はleonids: Gatsby Starter | Gatsbyを使用しているので、その前提で。
テーマが変わったり、 microCMS のスキーマが変われば諸々の調整が必要となります。
パッケージの追加
> yarn add yarn add gatsby-source-microcms

## 略

Done in 231.79s.

> yarn add marked

## 略

Done in 7.30s.
今回は microCMS を利用するので gatsby-source-microcms を追加します。また、本文コンテンツは Markdown で記述しているのですが Gatsby.js の自前の Markdownパーサ まで手が届かなかったので安直に marked を使いました。
それから、内部的には dotenv も使用していますが yarn.lock を見たら既に入っていたので追加はしていません。
gatsby-config.js
さて、改修の最初は Gatsby.js の設定から。
module.exports = {

  // 略

  plugins: [
    {
      resolve: `gatsby-source-filesystem`,
      options: {
        path: `${__dirname}/content/blog`,
        name: `blog`,
      },
    },

    // 略

    },
      `gatsby-plugin-feed`,
    {

    // 略

  ],

  // 略

}
これを以下のように修正。
const activeEnv = process.env.GATSBY_ACTIVE_ENV || process.env.NODE_ENV
if(activeEnv === "development") {
  require("dotenv").config({
    path: `.env.${activeEnv}`,
  })
}

module.exports = {

  // 略

  plugins: [
    {
      resolve: 'gatsby-source-microcms',
      options: {
        apiKey: process.env.API_KEY,
        serviceId: process.env.SERVICE_ID,
        apis: [{
          endpoint: process.env.APIS_ENDPOINT,
        }],
      },
    },

    // 略

    {
      resolve: `gatsby-plugin-feed`,
      options: {
        query: `
          {
            site {
              siteMetadata {
                title
                description
                siteUrl
              }
            }
          }
        `,
        feeds: [
          {
            serialize: ({ query: { site, allMicrocmsHogeHogeBlog } }) => {
              return allMicrocmsHogeHogeBlog.edges.map(edge => {
                return Object.assign({}, edge.node, {
                  description: edge.node.keywords,
                  date: edge.node.date,
                  url: site.siteMetadata.siteUrl + edge.node.slug,
                  guid: site.siteMetadata.siteUrl + edge.node.slug,
                  custom_elements: [{ "content:encoded": edge.node.body }],
                })
              })
            },
            query: `
              {
                allMicrocmsHogeHogeBlog(sort: {fields: [date], order: DESC}) {
                  totalCount
                  pageInfo {
                    perPage
                    pageCount
                  }
                  edges {
                    node {
                      body
                      createdAt
                      date
                      id
                      keywords
                      publishedAt
                      revisedAt
                      slug
                      title
                      updatedAt
                    }
                  }
                }
              }
            `,
            output: "/rss.xml",
            title: "HogeHoge Blog's RSS Feed",
          },
        ],
      },
    },

    // 略

  ],

  // 略

}
変更点は以下。
- ローカルのファイルをコンテンツのリソース参照先としていたのを microCMS をリソースとするように修正
gatsby develop時は問題なかったのですが、gatsby build時に RSSフィードを生成するgatsby-plugin-feedプラグイン が通常の Markdown の構成をデフォルトにしており、 microCMS に置き換えたことでデータスキーマが異なるとエラーになってしまいました (本番ビルド時に気付いた)。- そこで、
gatsby-plugin-feedプラグイン の GraphQL も今回定義した microCMS のスキーマに沿って変更しました。併せてserializeメソッド の中身もスキーマに合わせて調整。
- そこで、
- gatsby-source-microcms | Gatsbyのサンプルコードでは Git 管理下になる
gatsby-config.jsに APIキー 等の情報がそのままベタ書きになってしまうので、dotenvで外部ファイルに取り出すことで隠蔽しました- 後述しますが、 Vercel の環境変数も
process.envで渡ってくるので、developmentの場合はdotenv経由の外部ファイルをパラメータのリソースに、productionの場合は Vercel の環境変数をリソースとするように書き分けました
- 後述しますが、 Vercel の環境変数も
gatby-node.js
const path = require(`path`)
const { createFilePath } = require(`gatsby-source-filesystem`)

exports.createPages = async ({ graphql, actions }) => {
  const { createPage } = actions

  const blogPost = path.resolve(`./src/templates/blog-post.js`)
  const result = await graphql(
    `
      {
        allMarkdownRemark(
          sort: { fields: [frontmatter___date], order: DESC }
          limit: 1000
        ) {
          edges {
            node {
              fields {
                slug
              }
              frontmatter {
                title
              }
            }
          }
        }
      }
    `
  )

  if (result.errors) {
    throw result.errors
  }

  // Create blog posts pages.
  const posts = result.data.allMarkdownRemark.edges

  posts.forEach((post, index) => {
    const previous = index === posts.length - 1 ? null : posts[index + 1].node
    const next = index === 0 ? null : posts[index - 1].node

    createPage({
      path: post.node.fields.slug,
      component: blogPost,
      context: {
        slug: post.node.fields.slug,
        previous,
        next,
      },
    })
  })

  // Create blog post list pages
  const postsPerPage = 5
  const numPages = Math.ceil(posts.length / postsPerPage)

  Array.from({ length: numPages }).forEach((_, i) => {
    createPage({
      path: i === 0 ? `/` : `/${i + 1}`,
      component: path.resolve("./src/templates/blog-list.tsx"),
      context: {
        limit: postsPerPage,
        skip: i * postsPerPage,
        numPages,
        currentPage: i + 1,
      },
    })
  })
}

exports.onCreateNode = ({ node, actions, getNode }) => {
  const { createNodeField } = actions

  if (node.internal.type === `MarkdownRemark`) {
    const value = createFilePath({ node, getNode })
    createNodeField({
      name: `slug`,
      node,
      value,
    })
  }
}
これを以下のように修正。
const path = require(`path`)
const { createFilePath } = require(`gatsby-source-filesystem`)

exports.createPages = async ({ graphql, actions }) => {
  const { createPage } = actions

  const result = await graphql(
    `
      {
        allMicrocmsHogeHogeBlog(sort: {fields: [date], order: DESC}) {
          totalCount
          pageInfo {
            perPage
            pageCount
          }
          edges {
            node {
              body
              createdAt
              date
              id
              keywords
              publishedAt
              revisedAt
              slug
              title
              updatedAt
            }
          }
        }
      }
    `
  )

  if (result.errors) {
    throw result.errors
  }

  // Create blog posts pages.
  const posts = result.data.allMicrocmsHogeHogeBlog.edges

  result.data.allMicrocmsHogeHogeBlog.edges.forEach((post, index) => {
    const previous = index === posts.length - 1 ? null : posts[index + 1].node
    const next = index === 0 ? null : posts[index - 1].node

    createPage({
      path: post.node.slug,
      component: path.resolve('./src/templates/blog-post.js'),
      context: {
        slug: post.node.slug,
        previous,
        next,
      },
    });
  });

  // Create blog post list pages
  const postsPerPage = result.data.allMicrocmsHogeHogeBlog.pageInfo.limit || 10
  const numPages = Math.ceil(result.data.allMicrocmsHogeHogeBlog.totalCount / postsPerPage)
  console.log(result.data.allMicrocmsHogeHogeBlog.totalCount, postsPerPage)

  Array.from({ length: numPages }).forEach((_, i) => {
    createPage({
      path: i === 0 ? `/` : `/${i + 1}`,
      component: path.resolve("./src/templates/blog-list.tsx"),
      context: {
        limit: postsPerPage,
        skip: i * postsPerPage,
        numPages,
        currentPage: i + 1,
      },
    })
  })
}

exports.onCreateNode = ({ node, actions, getNode }) => {
  const { createNodeField } = actions

  if (node.internal.type === `microcmsHogeHogeBlog`) {
    const value = createFilePath({ node, getNode })
    createNodeField({
      name: `slug`,
      node,
      value,
    })
  }
}- gatsby-source-microcms | Gatsbyのサンプルコードはシンプル過ぎて GraphQL初心者には分かりづらかったので、
gatsby developで起動したhttp://localhost:8000/___graphqlの GraphQL を試すGUIでひたすらAPIを叩いてパラメータを変えたりしてどういう GraphQL を作れば望んだレスポンスを得られるか確認しながら地道に調整していきました - ベースのコードをなるべく変えないように調整して、各種プロパティの階層等を調整しました
MarkdownRemarkやallMarkdownRemarkが Markdownファイル をリソースとする場合のキーのような働きをしているのが分かったので、それをhttp://localhost:8000/___graphqlで表示された microCMS のキーに変更したり
GraphQL の構造やレスポンスに慣れるまで時間がかかりましたが、最終的には http://localhost:8000/___graphql であれこれ試したのが一番効果がありました。
blog-list.tsx
記事一覧ページ。トップページもこのテンプレートから生成されています。
// Gatsby supports TypeScript natively!
import React from "react"
import { PageProps, Link, graphql } from "gatsby"
import Layout from "../components/layout"
import SEO from "../components/seo"
import { rhythm } from "../utils/typography"

type PageContext = {
  currentPage: number
  numPages: number
}
type Data = {
  site: {
    siteMetadata: {
      title: string
    }
  }
  allMarkdownRemark: {
    edges: {
      node: {
        excerpt: string
        frontmatter: {
          title: string
          date: string
          description: string
        }
        fields: {
          slug: string
        }
      }
    }[]
  }
}

const BlogIndex = ({
  data,
  location,
  pageContext,
}: PageProps<Data, PageContext>) => {
  const siteTitle = data.site.siteMetadata.title
  const posts = data.allMarkdownRemark.edges
  const { currentPage, numPages } = pageContext

  const isFirst = currentPage === 1
  const isLast = currentPage === numPages
  const prevPage = currentPage - 1 === 1 ? "/" : `/${currentPage - 1}`
  const nextPage = `/${currentPage + 1}`

  return (
    <Layout location={location} title={siteTitle}>
      <SEO title="All posts" />
      {posts.map(({ node }) => {
        const title = node.frontmatter.title || node.fields.slug
        return (
          <article key={node.fields.slug}>
            <header>
              <h3
                style={{
                  marginBottom: rhythm(1 / 4),
                }}
              >
                <Link style={{ boxShadow: `none` }} to={node.fields.slug}>
                  {title}
                </Link>
              </h3>
              <small>{node.frontmatter.date}</small>
            </header>
            <section>
              <p
                dangerouslySetInnerHTML={{
                  __html: node.frontmatter.description || node.excerpt,
                }}
              />
            </section>
          </article>
        )
      })}

      <nav>
        <ul
          style={{
            display: `flex`,
            flexWrap: `wrap`,
            justifyContent: `space-between`,
            listStyle: `none`,
            padding: 0,
          }}
        >
          <li>
            {!isFirst && (
              <Link to={prevPage} rel="prev">
                ← Previous Page
              </Link>
            )}
          </li>
          <li>
            {!isLast && (
              <Link to={nextPage} rel="next">
                Next Page →
              </Link>
            )}
          </li>
        </ul>
      </nav>
    </Layout>
  )
}

export default BlogIndex

export const pageQuery = graphql`
  query blogPageQuery($skip: Int!, $limit: Int!) {
    site {
      siteMetadata {
        title
      }
    }
    allMarkdownRemark(
      sort: { fields: [frontmatter___date], order: DESC }
      limit: $limit
      skip: $skip
    ) {
      edges {
        node {
          excerpt
          fields {
            slug
          }
          frontmatter {
            date(formatString: "MMMM DD, YYYY")
            title
            description
          }
        }
      }
    }
  }
`
これを以下のように改修。
// Gatsby supports TypeScript natively!
import React from "react"
import { PageProps, Link, graphql } from "gatsby"
import Layout from "../components/layout"
import SEO from "../components/seo"
import { rhythm } from "../utils/typography"

type PageContext = {
  currentPage: number
  numPages: number
}
type Data = {
  site: {
    siteMetadata: {
      title: string
    }
  }
  allMicrocmsHogeHogeBlog: {
    edges: {
      node: {
        id: string
        keywords: string
        title: string
        updatedAt: string
        slug: string
        revisedAt: string
        publishedAt: string
        date: string
        createdAt: string
        body: string
      }
    }[]
  }
}

const BlogIndex = ({
  data,
  location,
  pageContext,
}: PageProps<Data, PageContext>) => {
  const siteTitle = data.site.siteMetadata.title
  const posts = data.allMicrocmsHogeHogeBlog.edges
  const { currentPage, numPages } = pageContext

  const isFirst = currentPage === 1
  const isLast = currentPage === numPages
  const prevPage = currentPage - 1 === 1 ? "/" : `/${currentPage - 1}`
  const nextPage = `/${currentPage + 1}`

  return (
    <Layout location={location} title={siteTitle}>
      <SEO title="All posts" />
      {posts.map(({ node }) => {
        const title = node.title || node.slug
        return (
          <article key={node.slug}>
            <header>
              <h3
                style={{
                  marginBottom: rhythm(1 / 4),
                }}
              >
                <Link style={{ boxShadow: `none` }} to={node.slug}>
                  {title}
                </Link>
              </h3>
              <small>{node.date}</small>
            </header>
            <section>
              <p
                dangerouslySetInnerHTML={{
                  __html: node.keywords,
                }}
              />
            </section>
          </article>
        )
      })}

      <nav>
        <ul
          style={{
            display: `flex`,
            flexWrap: `wrap`,
            justifyContent: `space-between`,
            listStyle: `none`,
            padding: 0,
          }}
        >
          <li>
            {!isFirst && (
              <Link to={prevPage} rel="prev">
                ← Previous Page
              </Link>
            )}
          </li>
          <li>
            {!isLast && (
              <Link to={nextPage} rel="next">
                Next Page →
              </Link>
            )}
          </li>
        </ul>
      </nav>
    </Layout>
  )
}

export default BlogIndex

export const pageQuery = graphql`
  query blogPageQuery($skip: Int!, $limit: Int!) {
    site {
      siteMetadata {
        title
      }
    }
    allMicrocmsHogeHogeBlog(
        sort: {fields: [date], order: DESC}
        limit: $limit
        skip: $skip
    ) {
      edges {
        node {
          body
          createdAt
          date(formatString: "YYYY/MM/DD")
          id
          keywords
          publishedAt
          revisedAt
          slug
          title
          updatedAt
        }
      }
    }
  }
`
ここは大々的な改修というよりは、 GraphQL の変更と、それに併せて変化したデータ構造に合わせてプロパティ名やチェーンを調整した感じです。
blog-post.js
import React from "react"
import { Link, graphql } from "gatsby"

import Bio from "../components/bio"
import Layout from "../components/layout"
import SEO from "../components/seo"
import { rhythm, scale } from "../utils/typography"

const BlogPostTemplate = ({ data, pageContext, location }) => {
  const post = data.markdownRemark
  // const siteTitle = data.site.siteMetadata.title
  const { previous, next } = pageContext

  return (
    <Layout location={location} title="Home">
      <SEO
        title={post.frontmatter.title}
        description={post.frontmatter.description || post.excerpt}
      />
      <article>
        <header>
          <h1
            style={{
              marginBottom: 0,
            }}
          >
            {post.frontmatter.title}
          </h1>
          <p
            style={{
              ...scale(-1 / 5),
              display: `block`,
              marginBottom: rhythm(1),
            }}
          >
            {post.frontmatter.date}
          </p>
        </header>
        <section dangerouslySetInnerHTML={{ __html: post.html }} />
        <hr
          style={{
            marginBottom: rhythm(1),
          }}
        />
        <footer>
          <Bio />
        </footer>
      </article>

      <nav>
        <ul
          style={{
            display: `flex`,
            flexWrap: `wrap`,
            justifyContent: `space-between`,
            listStyle: `none`,
            padding: 0,
          }}
        >
          <li>
            {previous && (
              <Link to={previous.fields.slug} rel="prev">
                ← {previous.frontmatter.title}
              </Link>
            )}
          </li>
          <li>
            {next && (
              <Link to={next.fields.slug} rel="next">
                {next.frontmatter.title} →
              </Link>
            )}
          </li>
        </ul>
      </nav>
    </Layout>
  )
}

export default BlogPostTemplate

export const pageQuery = graphql`
  query BlogPostBySlug($slug: String!) {
    site {
      siteMetadata {
        title
      }
    }
    markdownRemark(fields: { slug: { eq: $slug } }) {
      id
      excerpt(pruneLength: 160)
      html
      frontmatter {
        title
        date(formatString: "MMMM DD, YYYY")
        description
      }
    }
  }
`
これを以下のように改修。
import React from "react"
import { Link, graphql } from "gatsby"

import Bio from "../components/bio"
import Layout from "../components/layout"
import SEO from "../components/seo"
import { rhythm, scale } from "../utils/typography"
import marked from "marked"

const BlogPostTemplate = ({ data, pageContext, location }) => {
  const post = data.microcmsHogeHogeBlog
  // const siteTitle = data.site.siteMetadata.title
  const { previous, next } = pageContext

  return (
    <Layout location={location} title="Home">
      <SEO
        title={post.title}
        description={post.keywords}
      />
      <article>
        <header>
          <h1
            style={{
              marginBottom: 0,
            }}
          >
            {post.title}
          </h1>
          <p
            style={{
              ...scale(-1 / 5),
              display: `block`,
              marginBottom: rhythm(1),
            }}
          >
            {post.date}
          </p>
        </header>
        <section dangerouslySetInnerHTML={{ __html: marked(post.body) }} />
        <hr
          style={{
            marginBottom: rhythm(1),
          }}
        />
        <footer>
          <Bio />
        </footer>
      </article>

      <nav>
        <ul
          style={{
            display: `flex`,
            flexWrap: `wrap`,
            justifyContent: `space-between`,
            listStyle: `none`,
            padding: 0,
          }}
        >
          <li>
            {previous && (
              <Link to={'../'+previous.slug} rel="prev">
                ← {previous.title}
              </Link>
            )}
          </li>
          <li>
            {next && (
              <Link to={'../'+next.slug} rel="next">
                {next.title} →
              </Link>
            )}
          </li>
        </ul>
      </nav>
    </Layout>
  )
}

export default BlogPostTemplate

export const pageQuery = graphql`
  query BlogPostBySlug($slug: String!) {
    site {
      siteMetadata {
        title
      }
    }
    microcmsHogeHogeBlog(slug: { eq: $slug }) {
      id
      keywords
      title
      updatedAt
      slug
      revisedAt
      publishedAt
      date(formatString: "YYYY/MM/DD")
      createdAt
      body
    }
  }
`
こちらも blog-list.tsx と同様 GraphQL の変更とそれに伴うプロパティ名やチェーンの調整がメインです。本文の Markdown は冒頭の通り時短のため marked を使いました。
こうして見てみると、 GraphQL に慣れるまでかなり紆余曲折した気がするのですが、 blog-list.tsx や blog-post.js は特に出来上がったコードがあまり元から変化していませんね……。
microCMS で APIキー を参照
microCMS で APIキー を控えます。
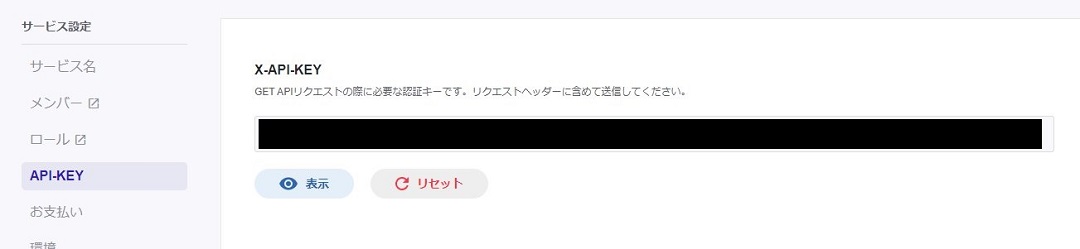
「サービス設定」→「APIキー」と進みます。今回必要なのは「X-API-KEY」。これを控えておきます。
Vercel の設定
続いて Vercel の設定へ。
環境変数の設定
まずは環境変数の設定。

プロジェクトを選択後、「Settings」から「Enviroment Variables」へ。
「NAME」にコードに記載したキーの名前を付けて、実際の値を入力します。画面では APIキー なので上述の microCMS の管理画面で控えた APIキー を入力。
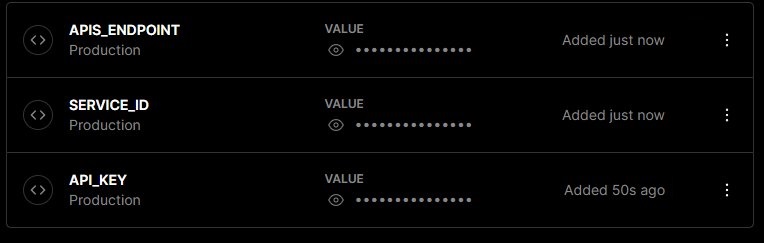
他、必要な変数をセットします。
Deploy Hooks を登録
次に Deploy Hooks をひっかけます。
プロジェクトの「Settings」から今度は「Git」へ。

Deploy Hooks に名前を入力、ブランチは通常は main になるかと。
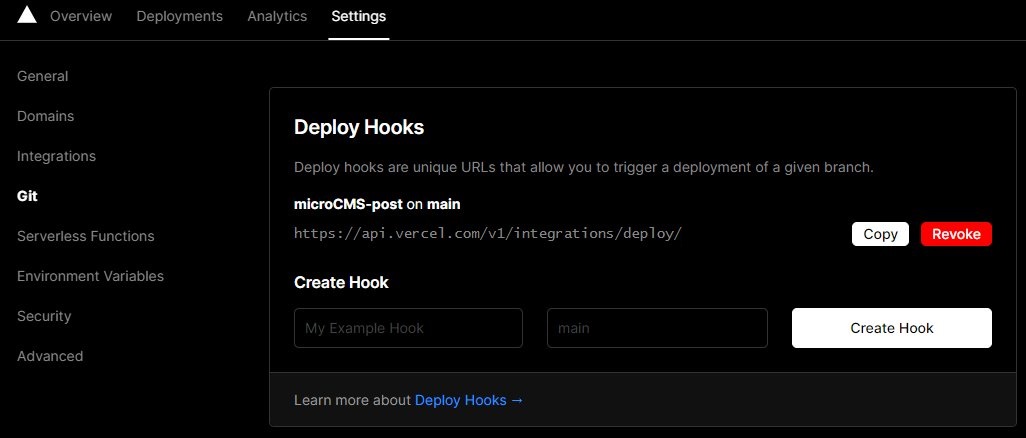
登録されたら Hook の URL を控えます。
microCMS の設定
お次は microCMS の画面へ。
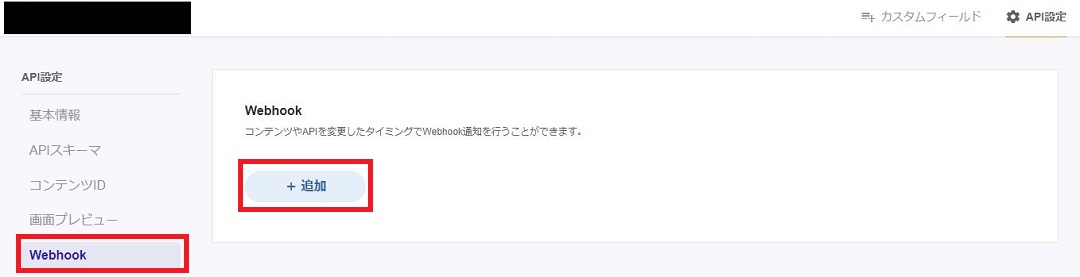
サービスの管理画面から「API設定」→「Webhook」へ。
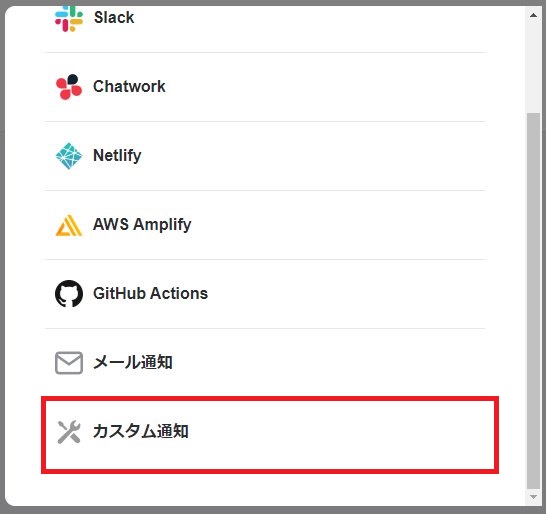
Vercel は一覧にはないので「カスタム通知」を選択。
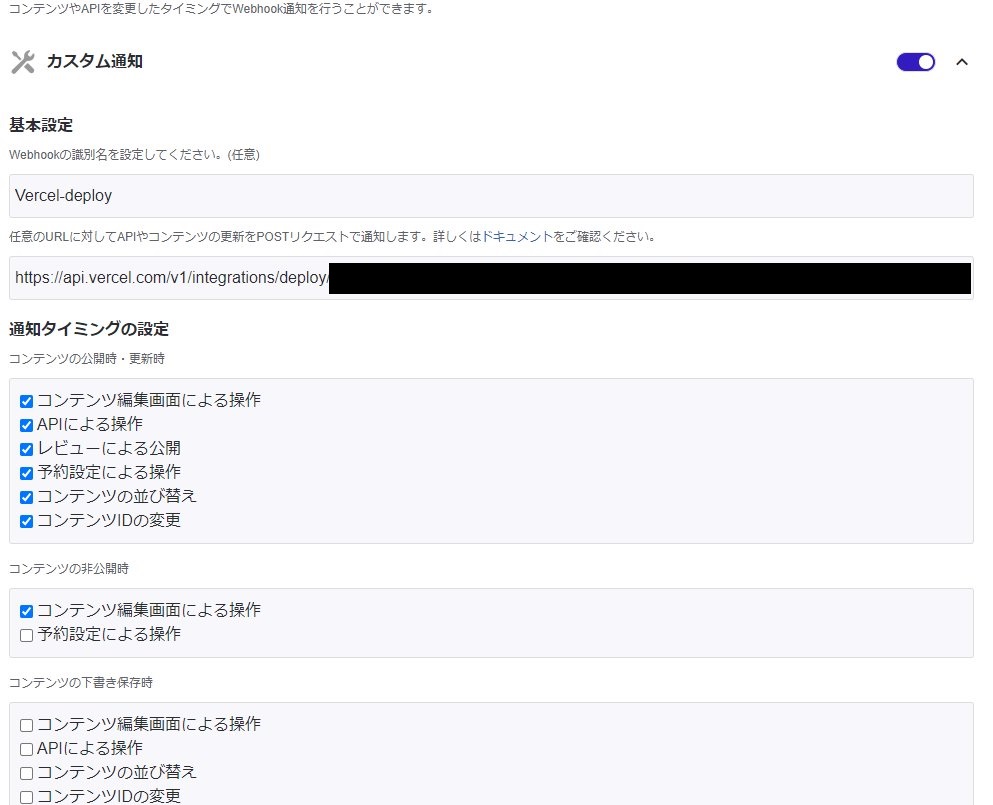
名前は任意の名前を。
Hook の URL に先ほど控えた URL を入力します。
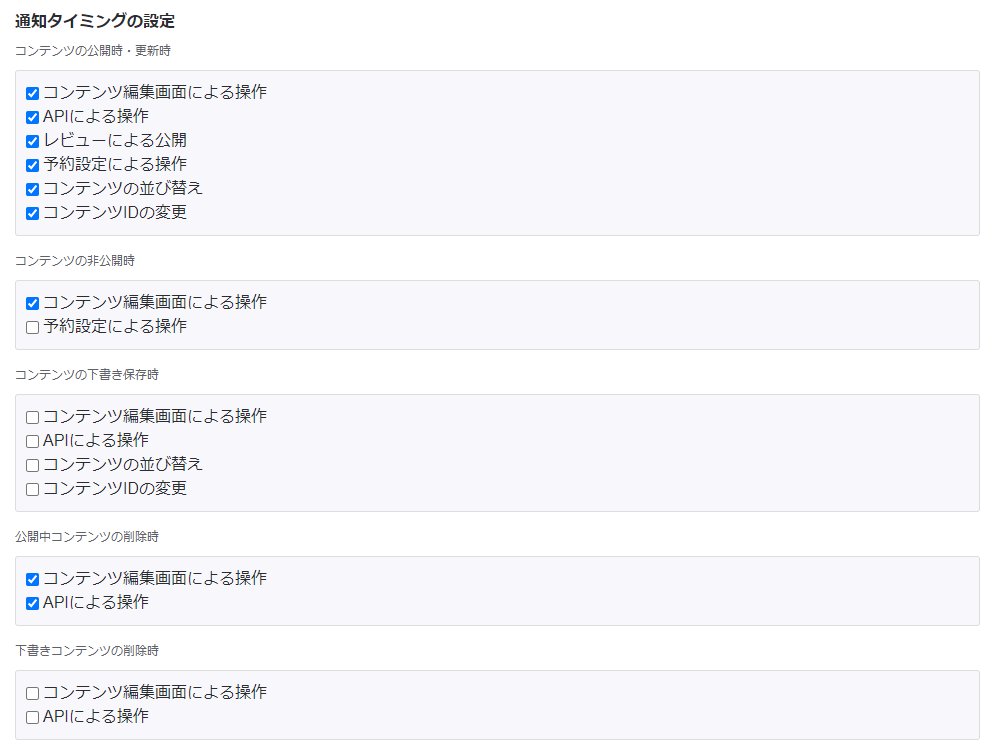
権限はこのような感じ。基本的に公開されているデータに変更が加わったら Hook が通知を行うものとします。
テスト投稿

ここまで設定できたら、試しに記事を新しく追加してみます。
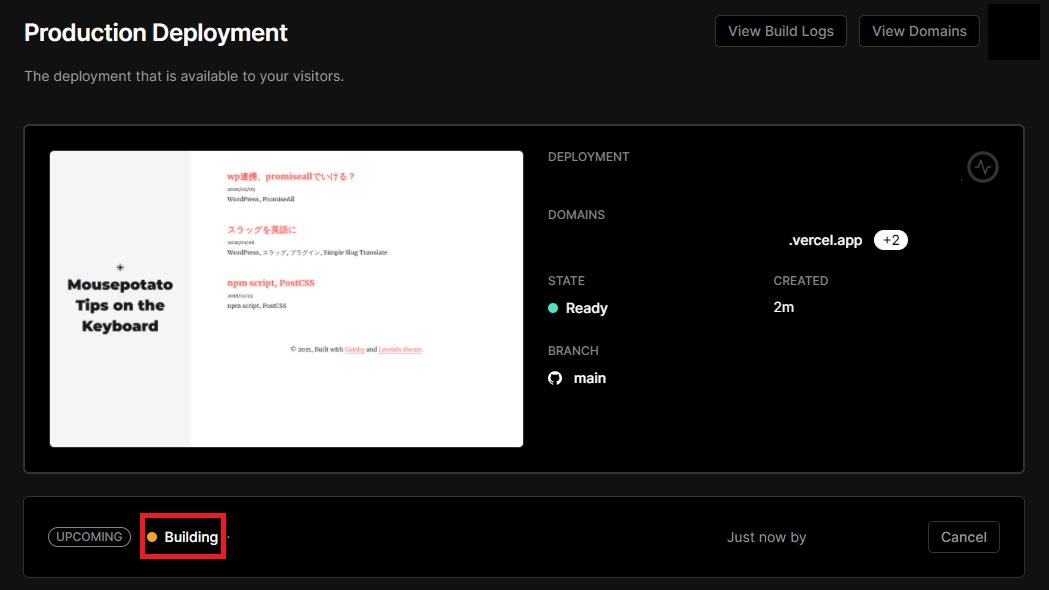
すると、 Vercel 側でプロジェクトが反応してビルドが走り始めました。
microCMS に記事を追加すると、 Github のリポジトリに push することなく勝手にビルドが走ってサイトが更新されることが確認できました。
これで Gatsby.js + Vercel + microCMS で JAMStack なブログの仕組みが構築できました。実験成功です。
参考
改修
- Gatsby + microcms + Vercel でブログを作って公開したい
- gatsby-source-microcms | Gatsby
- microCMS + Next.js でJamStackブログを作ってみた
コード、GraphQL、microCMSの設定、環境変数
- microCMS + Next.jsでJamstackブログを作ってみよう | microCMSブログ
- GatsbyJS + microCMSでJamstackなオウンドメディアを作ろう | microCMSブログ
Vercel の環境変数
- Vercel – Environment Variables – Vercel Documentation
- Vercelで環境変数を設定する | Next.js Blog Example with すのりら
- Vercelで設定した環境変数をNext.jsで使用する – Qiita
環境変数の分かち書き
gatsby-plugin-feed
基本 Gatsby.js のプラグインのページはシンプルなサンプルなので http://localhost:8000/___graphql で GraphQL を試して感覚をつかむ方が早かった気がします。