WordPress のSSL化については、普段は WP-CLI でサイトURLも一括置換をかけてしまうのですが、プラグインだけでできないか、と考えたので検証します。
1. FTP (vsftpd)
1.1. ユーザ追加
# useradd despite
# passwd despite
ユーザを追加します。
ユーザ制限
# vi /etc/vsftpd/user_list

despite
FTPユーザとして認識させます。
# vi /etc/vsftpd/user_conf/despite

local_root=/var/www/thesewords
ドキュメントルート設定。
# systemctl reload vsftpd
#
OK。
2. 仮想サイト作成
2.1. ディレクトリ作成
# mkdir /var/www/thesewords
# mkdir /var/www/thesewords/web
# chown -R despite:despite /var/www/thesewords/web
3.2. Webmin で仮想サイト作成
- 仮想ホストの作成
- アドレス:
XXX.XXX.XXX.XXX - ポート:
80 - ドキュメントのルート:
/var/www/thesewords/web - サーバ名:
express.example.jp - 仮想サーバの追加: 選択したファイル:
/etc/httpd/conf.d/thesewords.conf - ディレクティブのコピー元: どこにもない
- アドレス:
ディレクティブ
DocumentRoot "/var/www/thesewords/web"
ServerName express.example.jp
<Directory "/var/www/thesewords/web">
allow from all
AllowOverride All
Options FollowSymLinks
Require all granted
</Directory>
3. Let’s Encrypt
# certbot
Saving debug log to /var/log/letsencrypt/letsencrypt.log
Plugins selected: Authenticator apache, Installer apache
Starting new HTTPS connection (1): acme-v02.api.letsencrypt.org

Which names would you like to activate HTTPS for?
- - - - - - - - - - - - - - - - - - - - - - - - - - - - - - - - - - - - - - - -
1: express.example.jp
- - - - - - - - - - - - - - - - - - - - - - - - - - - - - - - - - - - - - - - -
Select the appropriate numbers separated by commas and/or spaces, or leave input
blank to select all options shown (Enter 'c' to cancel): 1
Obtaining a new certificate
Performing the following challenges:
http-01 challenge for express.example.jp
Waiting for verification...
Cleaning up challenges
Created an SSL vhost at /etc/httpd/conf.d/thesewords-le-ssl.conf
Deploying Certificate to VirtualHost /etc/httpd/conf.d/thesewords-le-ssl.conf

Please choose whether or not to redirect HTTP traffic to HTTPS, removing HTTP access.
- - - - - - - - - - - - - - - - - - - - - - - - - - - - - - - - - - - - - - - -
1: No redirect - Make no further changes to the webserver configuration.
2: Redirect - Make all requests redirect to secure HTTPS access. Choose this for
new sites, or if you're confident your site works on HTTPS. You can undo this
change by editing your web server's configuration.
- - - - - - - - - - - - - - - - - - - - - - - - - - - - - - - - - - - - - - - -
Select the appropriate number [1-2] then [enter] (press 'c' to cancel): 1

- - - - - - - - - - - - - - - - - - - - - - - - - - - - - - - - - - - - - - - -
Congratulations! You have successfully enabled https://express.example.jp

You should test your configuration at:
https://www.ssllabs.com/ssltest/analyze.html?d=express.example.jp
- - - - - - - - - - - - - - - - - - - - - - - - - - - - - - - - - - - - - - - -

IMPORTANT NOTES:
 - Congratulations! Your certificate and chain have been saved at:
   /etc/letsencrypt/live/express.example.jp/fullchain.pem
   Your key file has been saved at:
   /etc/letsencrypt/live/express.example.jp/privkey.pem
   Your cert will expire on 2021-01-29. To obtain a new or tweaked
   version of this certificate in the future, simply run certbot again
   with the "certonly" option. To non-interactively renew *all* of
   your certificates, run "certbot renew"
 - If you like Certbot, please consider supporting our work by:

   Donating to ISRG / Let's Encrypt:   https://letsencrypt.org/donate
Donating to EFF: https://eff.org/donate-leOK。あえてリダイレクトなしに設定。
4. MuSQL
- DB作成:
example_wpdb- 文字コード:
utf8mb4_0900_ai_ci - 照合順序:
utf8mb4_ja_0900_as_cs_ks
- 文字コード:
- ユーザ作成:
example_wpdb_user- 許可なし。
example_wpdbに対しての許可だけ与える
- 許可なし。
5.ex. MySQL 8 の不具合対処
ユーザを保存できませんでした : SQL set password for ‘example_wpdb_user’@’HOSTNAME’ = password(‘XXXXXXXXXXXX’) が失敗しました: You have an error in your SQL syntax; check the manual that corresponds to your MySQL server version for the right syntax to use near ‘password(‘XXXXXXXXXXXX’)’ at line 1
ユーザ作成時に怒られました。
# mysql -u root -p

mysql> set password for 'example_wpdb_user'@'HOSTNAME' = 'XXXXXXXXXXXX';
Query OK, 0 rows affected (0.10 sec)

mysql> alter user 'example_wpdb_user'@'HOSTNAME' identified with mysql_native_password by 'XXXXXXXXXXXX';
Query OK, 0 rows affected (0.12 sec)

mysql> SELECT host,user,plugin FROM mysql.user where user='example_wpdb_user';
+-----------+------------------+-----------------------+
| host      | user             | plugin                |
+-----------+------------------+-----------------------+
| HOSTNAME | example_wpdb_user | mysql_native_password |
+-----------+------------------+-----------------------+
1 row in set (0.00 sec)

mysql> quit;
Byeこの通りにパスワード変更、保存形式変更、確認してOK。
6. WordPress 引っ越し
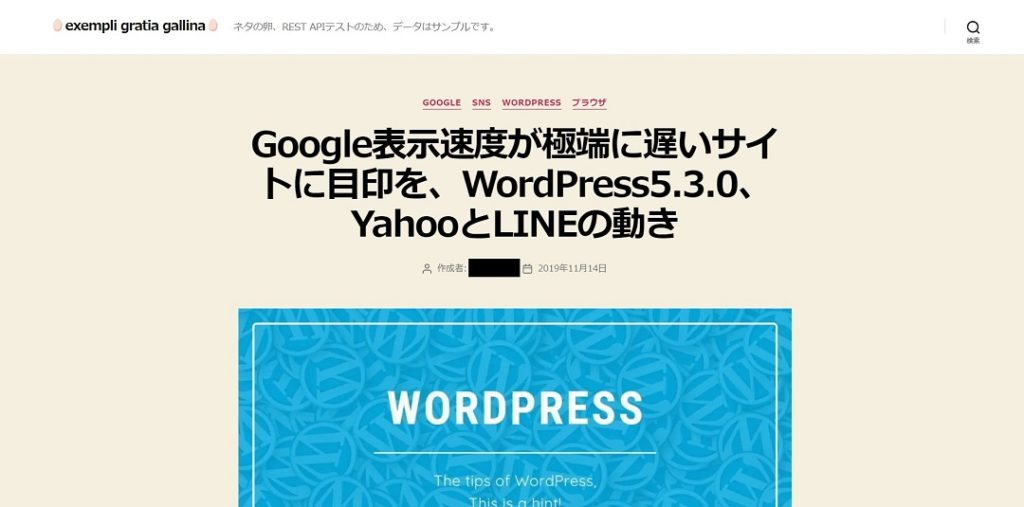
手元に適当なサンプルがなかったので以前作成したものを試しに引っ越してみます。
6.1. エクスポート
まずサンプルサイトのデータをエクスポートします。
ファイルはダウンロード、DBは Webmin からバックアップで実施。
6.2. wp-config.php の編集
DB を変更するので wp-config.php を編集します。
// 略

/** WordPress のためのデータベース名 */
define('DB_NAME', 'old_db');

/** MySQL データベースのユーザー名 */
define('DB_USER', 'old_user');

/** MySQL データベースのパスワード */
define('DB_PASSWORD', 'old_password');

/** MySQL のホスト名 */
define('DB_HOST', 'HOSTNAME');

/** データベースのテーブルを作成する際のデータベースのキャラクターセット */
define('DB_CHARSET', 'utf8');

/** データベースの照合順序 (ほとんどの場合変更する必要はありません) */
define('DB_COLLATE', '');

// 略
これを
// 略

/** WordPress のためのデータベース名 */
define('DB_NAME', 'example_wpdb');

/** MySQL データベースのユーザー名 */
define('DB_USER', 'example_wpdb_user');

/** MySQL データベースのパスワード */
define('DB_PASSWORD', 'new_password');

/** MySQL のホスト名 */
define('DB_HOST', 'HOSTNAME');

/** データベースのテーブルを作成する際のデータベースのキャラクターセット */
define('DB_CHARSET', 'utf8');

/** データベースの照合順序 (ほとんどの場合変更する必要はありません) */
define('DB_COLLATE', '');

// 略
こう。
それから、https://api.wordpress.org/secret-key/1.1/salt/でソルトを変更しておきます。
6.3. ファイルアップロード
# usermod -aG wheel,apache despite
# chown -R apache:apache /var/www/thesewords/web
# find /var/www/thesewords/web/ -type f -exec chmod 664 {} \;
# find /var/www/thesewords/web/ -type d -exec chmod 775 {} \;
ファイルアップロードする前に上を実施。
# chown -R apache:apache /var/www/thesewords/web
# find /var/www/thesewords/web/ -type f -exec chmod 664 {} \;
# find /var/www/thesewords/web/ -type d -exec chmod 775 {} \;
ファイル・ディレクトリに対してもう一度。
# chmod 400 /var/www/thesewords/web/wp-config.phpwp-config.php だけ別設定。
6.4. SQL をインポート
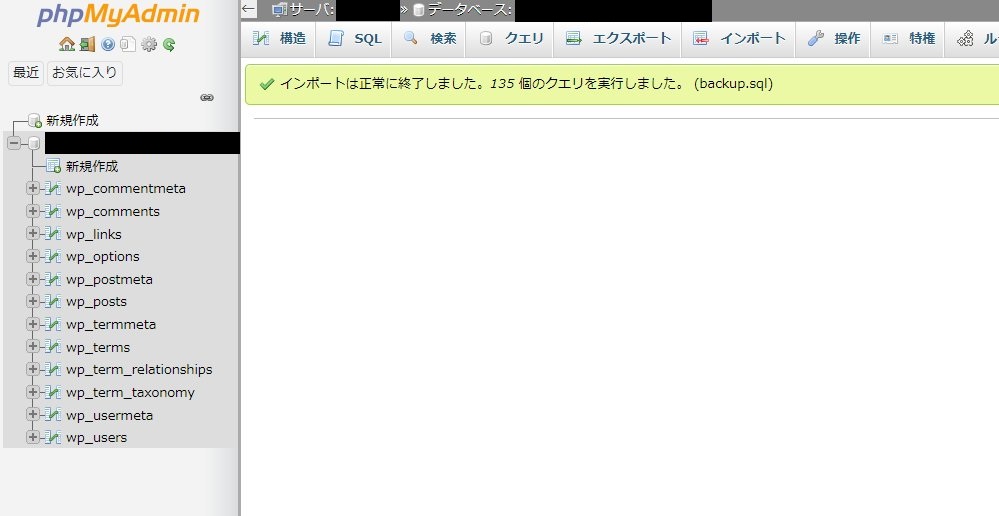
phpMyAdmin から SQL ファイルをインポート。
6.ex. URL 一括置換
WP-CLI で一括置換。ただしこれはSSL化のためではなく、URL変更のためです。そのため、あえてhttp始まりに置換しています。
# wp search-replace --recurse-objects 'https://hoge.example.jp/piyo/fuga' 'http://hogera.example.jp' --allow-root
+------------------+-----------------------+--------------+------+
| Table            | Column                | Replacements | Type |
+------------------+-----------------------+--------------+------+
| wp_commentmeta   | meta_key              | 0            | SQL  |
| wp_commentmeta   | meta_value            | 0            | SQL  |
| wp_comments      | comment_author        | 0            | SQL  |
| wp_comments      | comment_author_email  | 0            | SQL  |
| wp_comments      | comment_author_url    | 0            | SQL  |
| wp_comments      | comment_author_IP     | 0            | SQL  |
| wp_comments      | comment_content       | 0            | SQL  |
| wp_comments      | comment_approved      | 0            | SQL  |
| wp_comments      | comment_agent         | 0            | SQL  |
| wp_comments      | comment_type          | 0            | SQL  |
| wp_links         | link_url              | 0            | SQL  |
| wp_links         | link_name             | 0            | SQL  |
| wp_links         | link_image            | 0            | SQL  |
| wp_links         | link_target           | 0            | SQL  |
| wp_links         | link_description      | 0            | SQL  |
| wp_links         | link_visible          | 0            | SQL  |
| wp_links         | link_rel              | 0            | SQL  |
| wp_links         | link_notes            | 0            | SQL  |
| wp_links         | link_rss              | 0            | SQL  |
| wp_options       | option_name           | 0            | SQL  |
| wp_options       | option_value          | 3            | PHP  |
| wp_options       | autoload              | 0            | SQL  |
| wp_postmeta      | meta_key              | 0            | SQL  |
| wp_postmeta      | meta_value            | 0            | PHP  |
| wp_posts         | post_content          | 5            | SQL  |
| wp_posts         | post_title            | 0            | SQL  |
| wp_posts         | post_excerpt          | 0            | SQL  |
| wp_posts         | post_status           | 0            | SQL  |
| wp_posts         | comment_status        | 0            | SQL  |
| wp_posts         | ping_status           | 0            | SQL  |
| wp_posts         | post_password         | 0            | SQL  |
| wp_posts         | post_name             | 0            | SQL  |
| wp_posts         | to_ping               | 0            | SQL  |
| wp_posts         | pinged                | 0            | SQL  |
| wp_posts         | post_content_filtered | 0            | SQL  |
| wp_posts         | guid                  | 72           | SQL  |
| wp_posts         | post_type             | 0            | SQL  |
| wp_posts         | post_mime_type        | 0            | SQL  |
| wp_term_taxonomy | taxonomy              | 0            | SQL  |
| wp_term_taxonomy | description           | 0            | SQL  |
| wp_termmeta      | meta_key              | 0            | SQL  |
| wp_termmeta      | meta_value            | 0            | SQL  |
| wp_terms         | name                  | 0            | SQL  |
| wp_terms         | slug                  | 0            | SQL  |
| wp_usermeta      | meta_key              | 0            | SQL  |
| wp_usermeta      | meta_value            | 0            | PHP  |
| wp_users         | user_login            | 0            | SQL  |
| wp_users         | user_nicename         | 0            | SQL  |
| wp_users         | user_email            | 0            | SQL  |
| wp_users         | user_url              | 0            | SQL  |
| wp_users         | user_activation_key   | 0            | SQL  |
| wp_users         | display_name          | 0            | SQL  |
+------------------+-----------------------+--------------+------+
Success: Made 80 replacements.
OK。
6.ex2. トップページ以外で 500 Internal Server Error
サブディレクトリの WordPress をサブドメインに引っ越しする際は WP-CLI でも .htaccess が置いてけぼりにされる(ディレクトリ指定なのでドメイン指定だと漏れる)ので修正。
6.5. 表示確認
- トップ、2ページ目、個別記事、カテゴリアーカイブ、年月アーカイブが表示されることを確認
- ログイン正常
- 記事をアップ
OKそうです。
7. WordPress SSL化
いよいよ本題。プラグインのみでSSL化かつリダイレクトまでするようにしてみます。
7.1. 動作確認
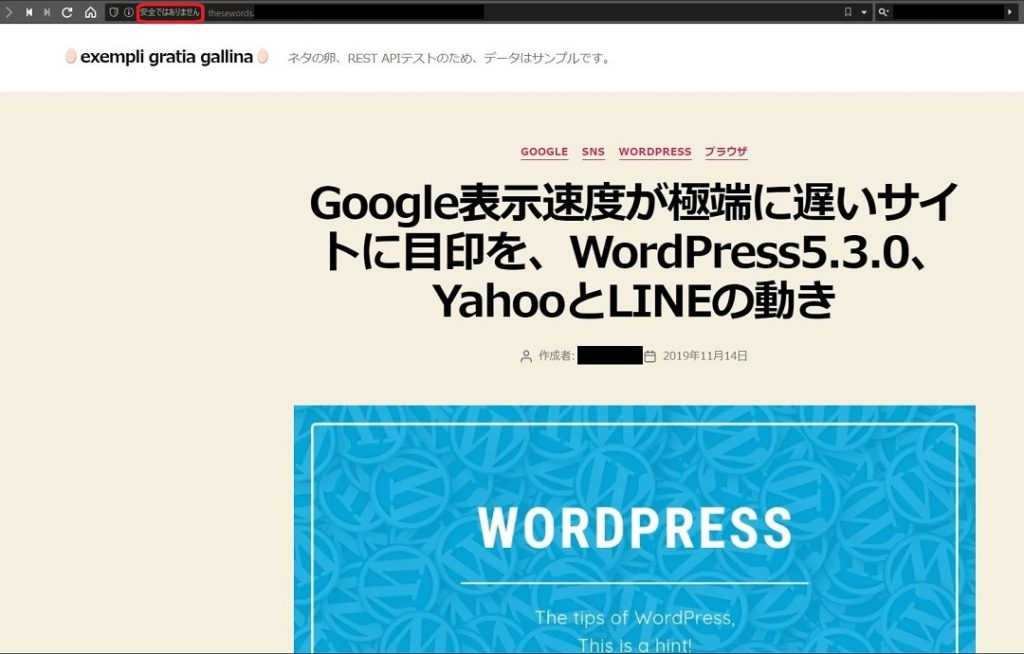
ページ遷移してhttpアクセスのまま、httpsにリダイレクトされない状況であることを確認。
7.2. 設定

今回は手っ取り早く「Really Simple SSL」を使います。まずは管理画面のプラグイン新規追加で Really Simple SSL を検索。インストールして有効化します。

Really Simple SSL の通知で「はい、SSLを有効化します。」をクリックします。

httpsアクセスになることを確認。

再び管理画面にログインします。

「設定」→「一般設定」で以下の2つが https 始まりになっていることを確認
- WordPress アドレス (URL)
- サイトアドレス (URL)
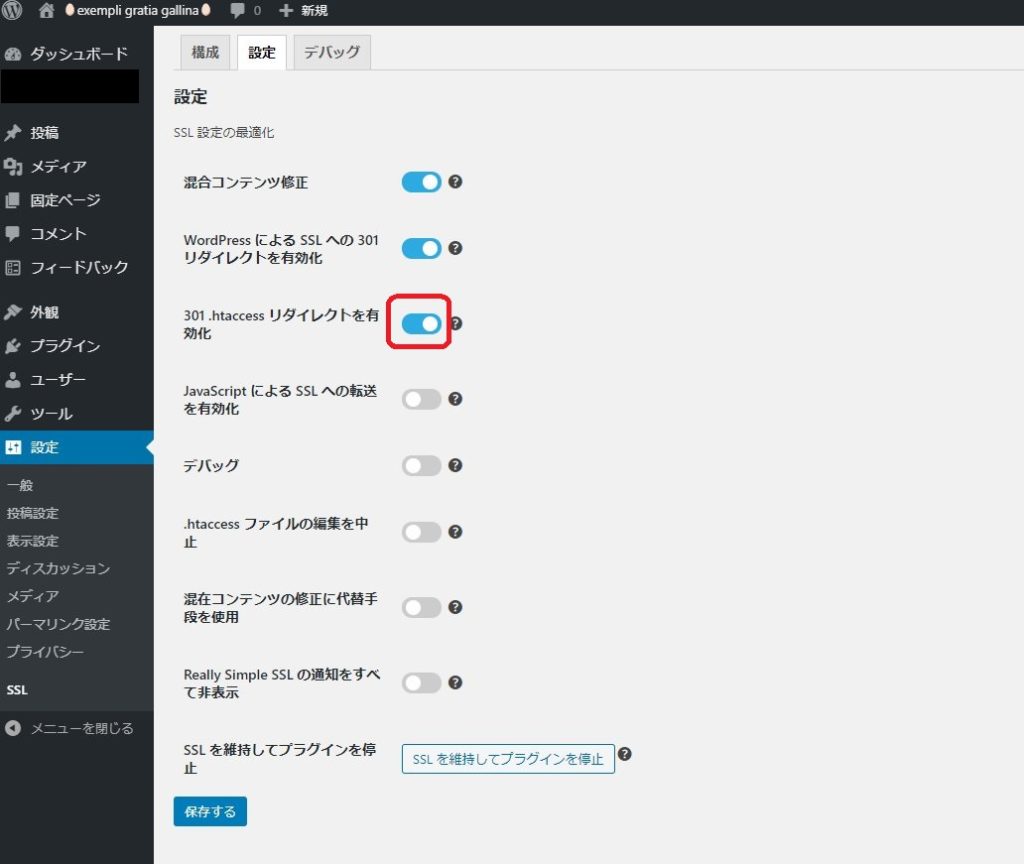
Really Simple SSL の設定画面で「301 .htaccess リダイレクトを有効化」のスイッチをオンにして「保存する」をクリック。
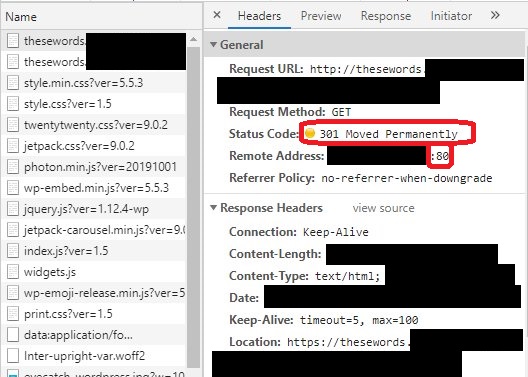
Chrome の Devtools で 301 リダイレクトがかかっていることを確認できました。OKです。
あれ、プラグインだけでhttp→httpsのリダイレクト設定が済んでしまいましたね……。
